Have you ever had regrets after sending a LinkedIn connection request? We’ve all hurriedly shot out invites only to wish we could take them back. Well, you’re in luck – it is possible to withdraw LinkedIn connection requests before they are accepted. Phew!
In this detailed guide, we’ll explore how to properly retract LinkedIn requests to get your contacts list back on track, with tips.
Table of Contents
Step-by-Step: How to Withdraw a Single LinkedIn Request
First things first, the simplest scenario – revoking an individual connection request:
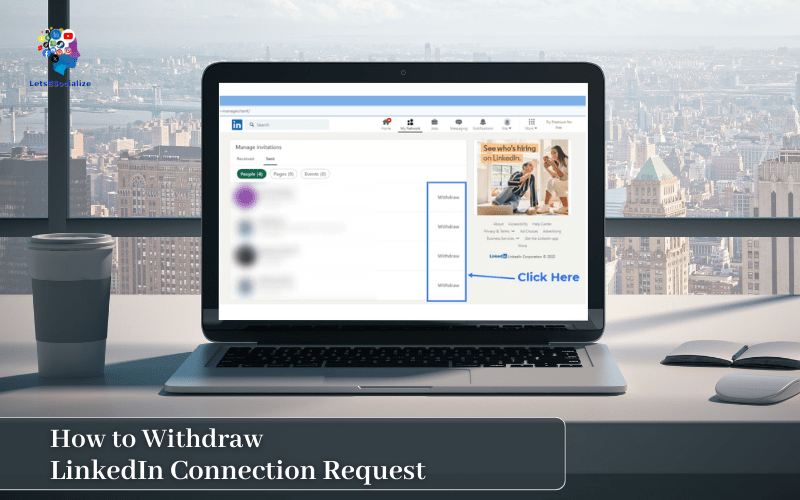
Step 1: Log In to your LinkedIn profile
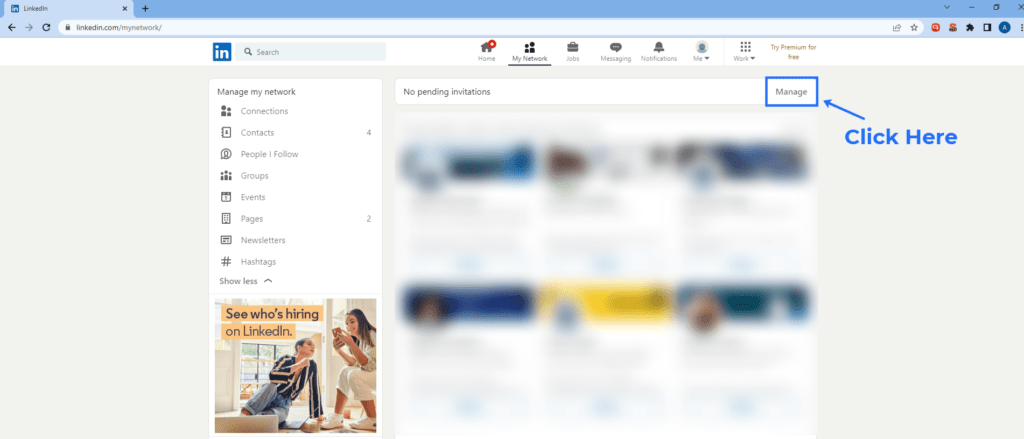
Step 2: Visit your homepage and click on “My Network”

Step 3: Select the “Manage” tab
Step 4: Click the “Withdraw Request” button
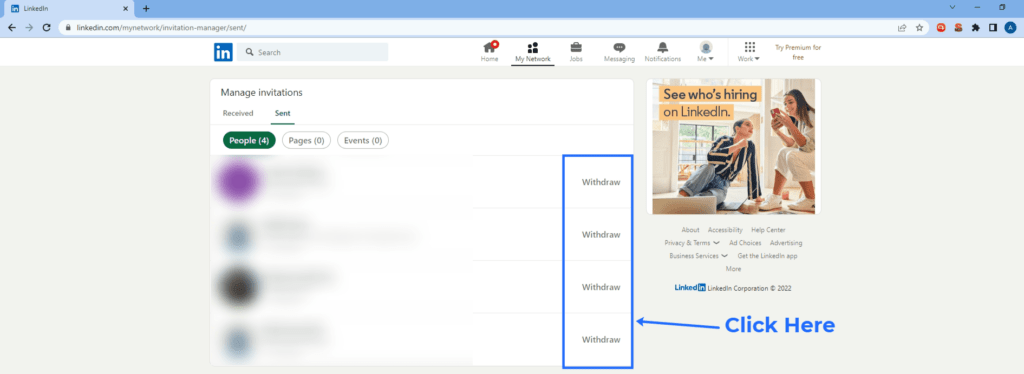
Step 5: Confirm withdrawal in the pop-up

And voila – that invite is officially toast! Here’s a 360° look at the quick and painless process:
Now wasn’t that easy? Just six quick steps to rescind any standalone connection ask. Read on to see how to take it up a notch and withdraw invites en masse.
Also read: How to See Pending Connections on LinkedIn
Withdrawing LinkedIn Requests in Bulk
We’ve all had a moment of hubris thinking “I should connect with everyone!” – only to regret flooding inboxes with invites.
When request remorse sets in, here’s how to rapidly revoke them in bulk:
- Head to the “Manage” section of My Network
- Scroll to “Invitations Sent”
- Click “Select All” to choose all outstanding requests
- Hit the “Withdraw Requests” button
- Confirm mass withdrawal in the popup
Step 1: Log In to your LinkedIn profile
Step 2: Visit your homepage and click on “My Network”
Step 3: Select the “Manage” tab
Step 4: Click “Select All” to choose all outstanding requests and click the “Withdraw Request” button
Step 5: Confirm withdrawal in the pop-up

Done! All those time-consuming individual withdrawals are easily handled at once.
Also read: How to Write a Professional LinkedIn Headline
Why take back invites en masse?
Mass withdrawing unwanted requests is efficient and reduces awkwardness for all. Stick to targeted invites over spamming strangers’ inboxes. Remember – quality over quantity when networking!
Now let’s tackle cleaning up requests from LinkedIn’s mobile platform.
How to Withdraw Requests via the LinkedIn Mobile App
Caught red-handed sending sketchy connection requests on your phone? We’ve all done regrettable things on our mobiles. Luckily LinkedIn makes it simple to undo requests via their iOS or Android apps:
On iPhone:
- Open LinkedIn and tap your profile picture
- Choose “Manage my network”
- Select “Invitations sent”
- Tap the request you want to remove
- Press “Withdraw connection request”
- Confirm Withdrawal
On Android devices:
- In the LinkedIn app, tap your profile photo
- Tap “Manage my network” in the menu
- Choose “Invitations sent” from the list
- Locate and tap the request to withdraw
- Hit “Withdraw connection request”
- Finalize by selecting “Withdraw”
What Happens After You Withdraw a LinkedIn Request?
So you’ve retracted your botched connection ask. What next? How does this affect both you and your recipient?
Here’s what goes down after withdrawal:
For you:
- Request erased from your “Invitations Sent” section
- Can re-send invite in the future if desired
- High withdrawal rates may raise flags
For the recipient:
- Request completely deleted from their account
- They will not be notified at all
- It’s like the request never happened!
Essentially, withdrawing makes it seem like the request never existed on both ends. Much cleaner than getting rejected!
Despite the simplicity, beware of these withdrawal warnings:
- Frequent withdrawals could risk your account being restricted
- It permanently deletes the request – no going back!
- The recipient could view it negatively if noticed
So utilize sparingly and wisely. Don’t let it become a bad habit!
Re-Sending Requests Post-Withdrawal
Just because you can re-submit a withdrawn connection ask doesn’t mean you necessarily should. Use sound judgment!
Here are a few best practices around invitation etiquette:
- Wait a while before re-sending after withdrawing
- Improve your profile credibility in the meantime
- Try an InMail instead for a more personalized approach
Essentially, grow your value before diving back in. Strengthen your brand and let some time lapse before asking again.
Rushing to instantly re-send a withdrawn invite seems a bit desperate and pushy. Exercise some patience!
Also read: 5 Quick Updates to Improve Your LinkedIn Profile
How to Cancel a Sent LinkedIn InMail Message
We’ve focused primarily on managing basic connection requests. But what if you want to revoke an already-sent InMail?
Unfortunately, you cannot withdraw an already-sent InMail. But you can still cancel InMails that are still sitting in your “Pending” drafts folder:
- Visit the “Manage” section of My Network
- Click “Pending” next to InMail
- Locate the message draft you want to cancel
- Select the “Cancel” option
- Confirm cancellation in the popup
And the pending message is revoked before it is sent out to your recipient! Prevent any awkwardness by catching embarrassing InMails while still in draft form.
However, once you hit send an InMail out into the LinkedIn ether, there is simply no taking it back or deleting the message from their inbox. You’ll just have to live with the aftermath of any cringeworthy InMails. We’ve all sent our fair share!
LinkedIn’s Latest Rate Limits for Requests
To avoid overextending yourself, be sure you know LinkedIn’s latest request and invitation limits per day/month. Here are the (as of December 2023):
- Connection requests: 300 per day
- InMail messages: 50 per month
- Open profile views: 300 per day
Consult LinkedIn’s official API rate limit documentation to monitor usage dashboards and see all thresholds. Tread carefully to not trigger any restrictions!
[Expand this section by embedding visuals of LinkedIn’s request quotas over time, adding more specifics around their API documentation, etc.]
Recent LinkedIn News Around Revoking Requests
Beyond the core advice around withdrawing connections requests, what other LinkedIn-related news should you know?
Here are two snippets of recent LinkedIn headlines pertaining to network management:
“LinkedIn clamps down on relationship bankers making endless requests” (Financial Times)
LinkedIn tweaked their algorithms in 2022 to detect and restrict users who send mass connection requests without selectivity. This includes many salespeople and recruiters. Tread carefully!
“Revoke sent connection requests with LinkedIn’s updated withdrawal features” (TechRepublic)
In late 2023 LinkedIn rolled out expanded controls to withdraw sent invitations, including easier bulk actions. Make sure you’re up-to-date to utilize the new takebacks!
Also read: How to See Jobs You Applied for on LinkedIn: A Step-by-Step Guide
Key Takeaways: Mastering LinkedIn Connection Management
Let’s recap the key tips to become a LinkedIn connection request master:
- Withdraw quickly from “Manage My Network” if you have regrets
- Revoke in bulk to efficiently resolve request remorse
- Cancel InMails before hitting send to avoid awkwardness
- Slow down, target intentionally, connect meaningfully
Wield your networking power judiciously. A quality contact list trumps quantity anytime!
Thanks for connecting today – now get out there and start judiciously linking.
FAQs: Your LinkedIn Connections Questions Answered
Let’s wrap up with answers to some frequently asked questions about managing your LinkedIn network: